How to Create an Amazon Seller Account A Step-by-Step Guide

Starting your journey as an Amazon seller can be an exciting venture, but the process might seem overwhelming at first. Don’t worry—this guide breaks it down step by step in simple language to help you get started easily.
Step 1: Understand What an Amazon Seller Account Is
Amazon provides a platform for individuals and businesses to sell their products to millions of customers worldwide. Setting up a seller account lets you list products, manage inventory, and process orders—all from one dashboard.
Step 2: Gather the Required Documents
Before creating your Amazon seller account, make sure you have the following documents and details ready:
1. Email Address – A dedicated email for your Amazon account.
2. Phone Number – For verification purposes.
3. Government ID – A scanned copy of your passport, driver’s license, or any other valid ID.
4. Bank Account Information – To receive payments from Amazon.
5. Business Details:
Business name (if applicable).
GST number ( must )
6. Tax Information – PAN card
7. Billing Address – A valid address for documentation.
Step 3: Visit the Amazon Seller Central Website
Go to the Amazon Seller Central website: https://sell.amazon.com
Step 4: Register for a Seller Account
Follow these steps to register:
1. Click on “Sign Up”

On the homepage of Seller Central, click the "Sign Up" button.
2. Enter Personal Details

Provide your name, email, and create a password.
3.Enter the OTP

3.Enter the Email address and password

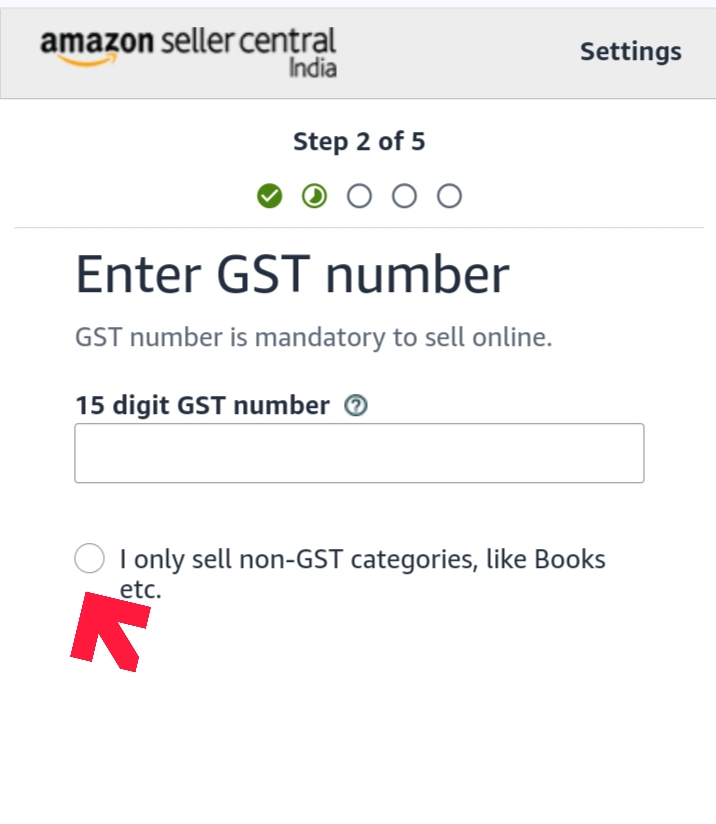
4. Enter the GST Number if don't have GST choose sell non GST categories.
5.Enter the PAN Number

6.Choose Amazon Store name


9.Choose shipping fee

10.Add Your Bank Account

Step 5: Adding Products to Your Amazon Store
Adding products is straightforward. Here’s how you do it:
1. Log in to Seller Central.
2. Go to the “Inventory” tab and click “Add a Product.”

3. Choose an Existing Product or Add a New One:If your product is already listed on Amazon, search for it using the product code (UPC, EAN, or ISBN).

If it’s a new product, select “Create a New Listing.”

4. Fill in Product Details:Product name, description, and features.Pricing,Quantity.Product images (make sure they meet Amazon’s image requirements).

5. Set Shipping Options:Decide whether you’ll fulfill orders yourself or use Amazon’s Fulfillment by Amazon (FBA) service.
Step 6: Managing Orders : Once your products are live, you’ll start receiving orders. Here’s how to handle them:
1. Check for New Orders: Go to the “Orders” tab in Seller Central.
2. Prepare for Shipping: Pack the product securely. Use appropriate-sized boxes and protective materials.Include the invoice inside the package.
3. Generate a Shipping Label: If you’re using Amazon shipping, download the shipping label and attach it to the package.
4. Ship the Product: Drop the package at the designated courier service or arrange for a pickup
Step 7: Packaging Tips: Proper packaging protects your product during transit. Here are some tips:
Use sturdy boxes: Seal packages with strong tape.
Add padding to prevent damage: Label the package clearly with the buyer’s address and the Amazon-provided tracking ID.
Step 8: Track and Manage Reviews
1. After shipping, monitor customer feedback in Seller Central.
2. Address any issues promptly to maintain good ratings.
Step 9: Monitor Payments
Amazon pays sellers based on their payment cycle. Keep an eye on your earnings under the “Reports” tab in Seller Central
Congratulations! You’re now ready to run your Amazon seller account. Success on Amazon takes time and dedication, so stay consistent, optimize your listings, and provide excellent customer service.
Let me know in comment section if you have any questions.
.jpg)


Comments
Post a Comment